

Step by Step Guide For Building A Blockchain With Substrate
Hi there, today we’re going to learn how you can build your 1st blockchain with Substrate. If you haven’t read my previous story on the Overview of Substrate. Go ahead and read this for a better understanding of the Substrate platform.
The substrate can be described as a blockchain framework. It is an open-source framework for building customized blockchains. These blockchains can be run entirely autonomously, which means they don’t depend on any external technology to run. It enables you to build your blockchain from previously built components. i.e, enabling you to quickly build blockchains based on field-tested code that is powering a large ecosystem of blockchain projects across the world.
Comprising a voluminous collection of tools and libraries, Substrate is the primary blockchain software development kit (SDK) that was used to build the Polkadot layer-0 protocol and can be used by developers to create any type of blockchain.
As you already know Blockchain consists of decentralized computers — called Nodes — to form a network.
The substrate provides a flexible, open, and extensible development environment that allows you to design and build fully-customized blockchain nodes to suit your application or business model needs.
If you want to become a blockchain developer. You have to learn how to compile and launch a single local blockchain node. In this step-by-step guide, you’ll build and start a single node blockchain using the node template.
The Substrate node template provides a working single-node blockchain that you can run locally in your development environment. The node template includes several predefined components — such as user accounts and account balances — so that you can experiment with performing common tasks. Without making any changes to the template, you can run a functional node that produces blocks and allows transactions.
There are the steps you’re going to follow.
After you start the local blockchain node, we’ll also learn how you can use a Substrate front-end template to view information about blockchain activity and submit a transaction.
Let’s move forward.
Before you can start developing a Substrate-based blockchain, you need to prepare your development environment with the required compiler and tools. The first step in preparing your computer is to install Rust. The steps for installing Rust depend on the operating system of the computer you are using for Substrate development.
If you already have Rust installed, you can skip this step.
The Substrate node template provides a working development environment so that you can start building on Substrate right away.
I’ve also discussed with you in my previous story how you can build the node template. If you have already compiled the node template on the local computer, you can skip this step too and move to the next step.
To compile the Substrate node template:
- Open a terminal shell on your computer.
- Clone the node template repository by running the following command:
git clone https://github.com/substrate-developer-hub/substrate-node-template
- Change to the root of the node template directory and checkout the
polkadot-v0.9.26branch by running the following command:
cd substrate-node-template && git checkout polkadot-v0.9.26
- Compile the node template by running the following command:
cargo build --release
You should always use the --release flag to build optimized artifacts.
After your node compiles, you are ready to start exploring what it does using the front-end template.
To start the local Substrate node:
- Open a terminal shell.
- Change to the root directory where you compiled the Substrate node template.
- Start the node in development mode by running the following command:
./target/release/node-template --dev
The node-template command-line options specify how you want the running node to operate. In this case, the --dev option specifies that the node runs in developer mode using the predefined development chain specification. By default, this option also deletes all active data—such as keys, the blockchain database, and networking information when you stop the node by pressing Control-c. Using the --dev the option ensures that you have a clean working state any time you stop and restart the node.
- Verify your node is up and running successfully by reviewing the output displayed in the terminal.
The terminal should display output similar to this:
2021-11-24 15:36:35 Running in --dev mode, RPC CORS has been disabled.
2021-11-24 15:36:35 Substrate Node
2021-11-24 15:36:35 ✌️  version 4.0.0-dev-82b7c2c-aarch64-macos
2021-11-24 15:36:35 ❤️  by Substrate DevHub <https://github.com/substrate-developer-hub>, 2017-2021
2021-11-24 15:36:35 📋 Chain specification: Development
2021-11-24 15:36:35 🏷 Node name: six-wash-9274
2021-11-24 15:36:35 👤 Role: AUTHORITY
2021-11-24 15:36:35 💾 Database: RocksDb at /tmp/substrateP1jD7H/chains/dev/db
2021-11-24 15:36:35 ⛓  Native runtime: node-template-100 (node-template-1.tx1.au1)
2021-11-24 15:36:35 🔨 Initializing Genesis block/state (state: 0xa59b…5331, header-hash: 0xc5d2…37f3)
2021-11-24 15:36:35 👴 Loading GRANDPA authority set from genesis on what appears to be first startup.
2021-11-24 15:36:35 ⏱  Loaded block-time = 6s from block 0xc5d2fdad35e14684753f087c1a20f022274e154d39add4f7efe34e95476a37f3
2021-11-24 15:36:35 Using default protocol ID "sup" because none is configured in the chain specs
2021-11-24 15:36:35 🏷 Local node identity is: 12D3KooWG5niQF5bjsFao3D8DZRpUUB6uWZC2pK8hCDZ94zsr8Sc
2021-11-24 15:36:35 📦 Highest known block at #0
...
...
...
2021-11-24 15:36:40 💤 Idle (0 peers), best: #1 (0xd2b5…d03f), finalized #0 (0xc5d2…37f3), ⬇ 0 ⬆ 0
If the number after finalized is increasing, your blockchain is producing new blocks and reaching consensus about the state they describe.
I’ll explore the details of the log output in later stories. For now, it’s only important to know that your node is running and producing blocks
- Keep the terminal that displays the node output open to continue.
Now you have completely learned how to start a working Substrate-based blockchain node using the node template.
You can interact with the blockchain node using a front-end user interface.
The front-end template uses ReactJS to render a web browser interface that enables you to interact with the Substrate-based blockchain node. You can use this Front-end template as a starting point for creating user interfaces for your own projects in future.
The front-end template requires Yarn and Node.js. If you don’t have these tools, install them first.
To install the front-end template:
- Check whether
nodeis installed on your local computer by running the following command:
node --version
- If the command doesn’t return a version number, download and install
nodeby following the instructions for the operating system you use on the Node.js website. Thenodeversion should be at least v14 to run the front-end template. - Check whether
yarnis installed on your local computer by running the following command:
yarn --version
The yarn version should be at least v3 to run the front-end template.
- If the command doesn’t return a version number, download and install
yarnby running the following command:
npm install -g yarn
- Clone the front-end template repository by running the following command:
git clone https://github.com/substrate-developer-hub/substrate-front-end-template
- Change to the root of the front-end template directory by running the following command:
cd substrate-front-end-template
The Substrate front-end template consists of user interface components to enable you to interact with the Substrate node and perform a few common tasks.
To use the front-end template:
- Open a new terminal shell on your computer, change to the root directory where you installed the front-end template.
- Start the front-end template by running the following command:
yarn start
Open http://localhost:8000 in a browser to view the front-end template.
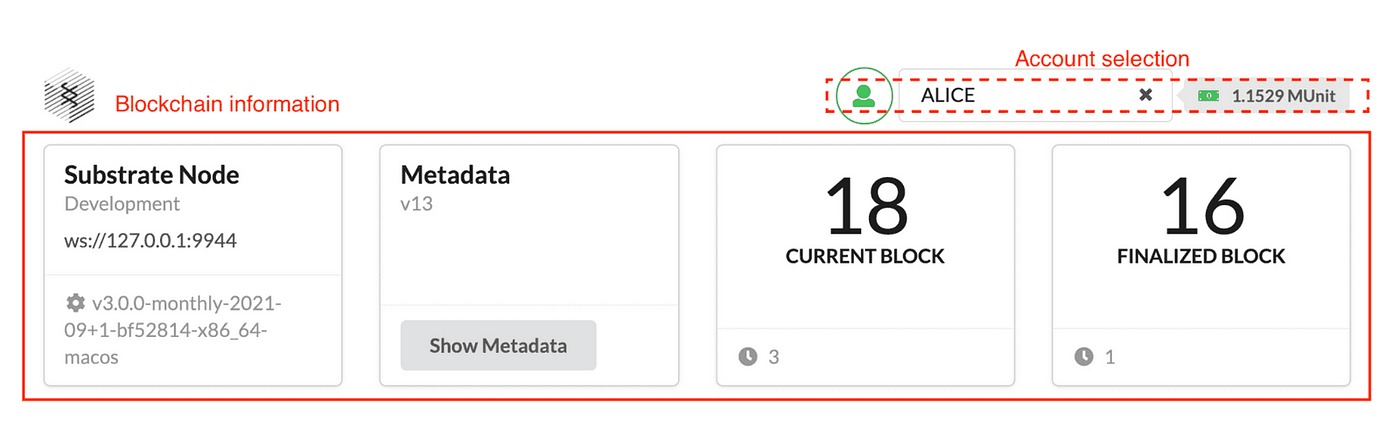
The top section has an Account selection list for selecting the account to work with when you want to perform on-chain operations. The top section of the template also displays information about the chain to which you’re connected.
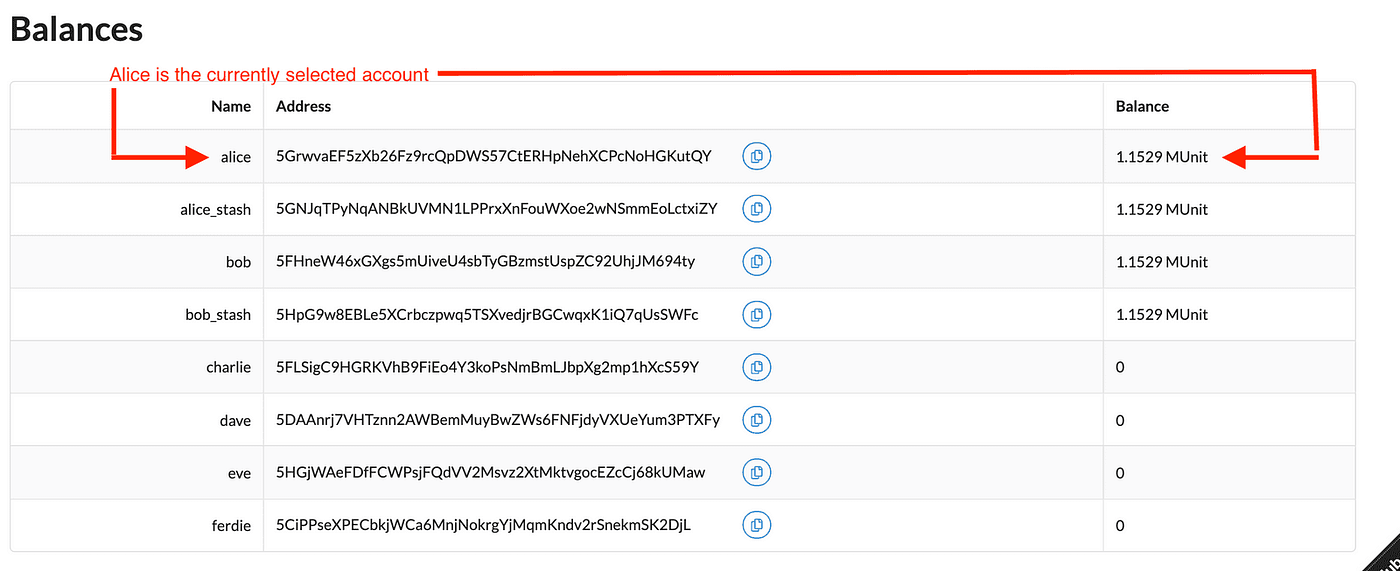
You might also notice that the front-end template displays a Balances table with some predefined accounts and that a few of those accounts are preconfigured with funds. You can use this sample data to try out operations like transferring funds.
Now that you have a blockchain node running on your local computer and you have a front-end template available for performing on-chain operations, you are ready to explore different ways to interact with the blockchain.
By default, the front-end template includes several components that allow you to try different common tasks. You can perform a simple transfer operation that moves funds from one account to another.
To transfer funds to an account:
- In the Balances table, notice the predefined accounts — such as dave — that have no funds associated with them.
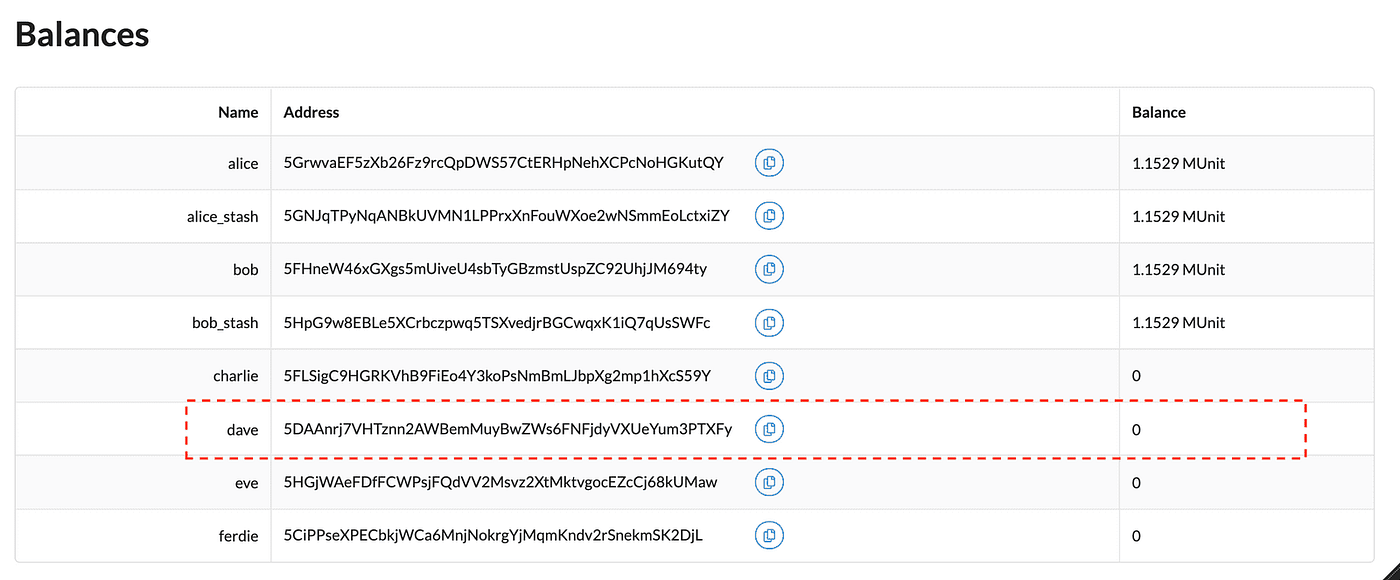
- Under the Balances table, the front-end template also displays a Transfer component. You use this component to transfer funds from one account to another.
- Copy and paste the address for the dave account to specify the address to which you are transferring funds.
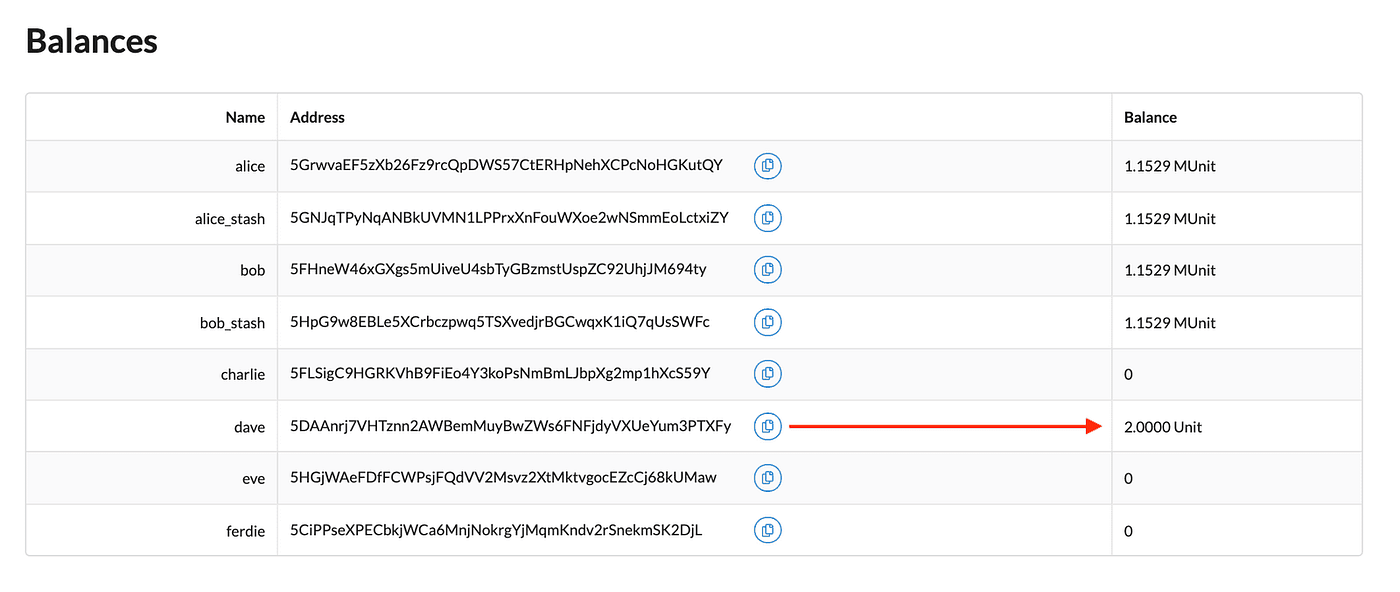
- Specify at least 1000000000000 as the amount to transfer, then click Submit.
- Notice that the values in Balances table is updated with the transfer.
- Check the Events component to see events related to the transfer you just completed.
The Substrate blockchain reports the result of asynchronous operations as events, so you can use the Events components to see details about each operation performed as part of the transfer. For example:
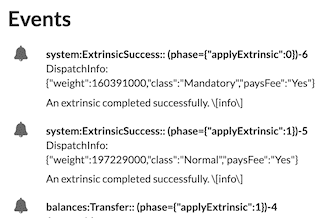
- When the transaction has been completed and included in a block, you see a confirmation message similar to the following:
😉 Finalized. Block hash: 0xda7e9e935abf5a3a2fdb0a27d67cd7a69e628165b5827255af2635ba226411a4
After a successful transfer, you can continue to explore the front-end template components or stop the local Substrate node the state changes you made. Because you specified the --dev option when you started the node, stopping the local node stops the blockchain and purges all persistent block data so that you can start with a clean state next time you start the node.
To stop the local Substrate node:
- Return to the terminal shell where the node output is displayed.
- Press Control-c to terminate the running process.
- Verify your terminal returns to the terminal prompt in the
substrate-node-templatedirectory.
In this step-by-step guide for building a blockchain, you have successfully learned that how to build your 1st blockchain with Substrate. You have also learned how to view and interact with the blockchain node using a front-end user interface and how to make a simple transfer from one account to another. Keep reading for further stories related to Substrate.
 Bitcoin
  Ethereum
  Tether
  BNB
BNB  USDC
USDC  XRP
XRP  Solana
  TRON
TRON  Figure Heloc
  Hyperliquid