

Getting Started with Blockchain on AWS, Part 2: Access Data, Create Tables/Indexes
After earlier demonstrating how to create a new ledger and then populate the database with sample data, Brien Posey shows how to access that data, and how to create some new tables and indexes.
In my previous blog post, I showed you how to create a new ledger using Amazon’s Quantum Ledger Database (QLDB) and then populate the database with sample data. In this post, I want to continue the discussion by showing you how to access that data, and how to create some new tables and indexes of your own.
As mentioned in the previous post, you can interact with the data using the Query Editor. QLDB queries are very similar in structure to SQL queries, and will likely be familiar to anyone who normally works with SQL.
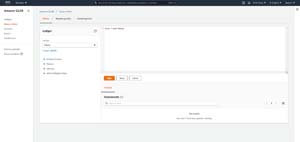
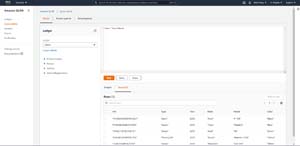
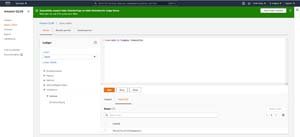
To run a query, simply enter the query into the text box provided, as shown in Figure 1, and then click the Run button. In this case for example, I entered Select * from Vehicle, which returns all vehicle records. When the query completes, the query results are displayed at the bottom of the screen, as shown in Figure 2.

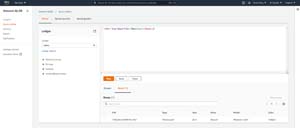
Of course if this were a real-world situation and you had a large dataset then you probably would not be writing queries that return every record in existence. Thankfully, there are any number of ways to filter the results. If for example, you wanted to filter the results so that only motorcycles were displayed (rather than all vehicle types), you could use this query: Select * From Vehicle Where Vehicle.Type="Motorcycle". You can see the query and its results in Figure 3.
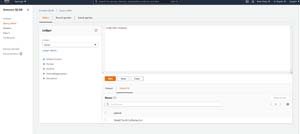
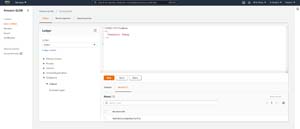
Now that I have shown you a couple of basic queries that you can perform using the sample data, I want to turn my attention to the creation of new data. For that, let’s create a brand-new table and index. Creating a new table is simple. All you have to do is to use the Create Table command, followed by the name of the table that you want to create. Since Amazon’s sample data is related to drivers licenses and vehicle registrations, I will create a new table called Violations. You can see the command, the results, and the new table shown in Figure 4.
As it stands right now, the new table is empty and does not even include any fields. Amazon recommends creating an index for each field. Indexes are optional, but they greatly improve performance.
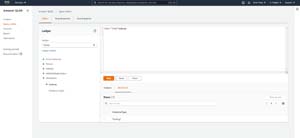
Creating an index is an easy process. Just use the Create Index On command, followed by the table name and the name of the index that you want to create. The index name will need to be in parentheses. If for example, I wanted to create an index named ViolationType within the Violations table, I would use this command:
Create Index On Violations (ViolationType)
You can see the command and the newly created index in Figure 5.
Now that we have created a table and an index, let’s add a record to the new table. To add a record to an existing table, you will need to use the Insert Into command. This is one area where QLDB works a little bit differently from SQL. Suppose for instance that we needed to add a value of Parking to the ViolationTypes index. In SQL the command might look like this:
Insert Into Violations (ViolationType) Values ('Parking}';
In QLDB however, this is what the command looks like (shown in Figure 6):
    INSERT INTO Violations
    << {
        'ViolationType' : 'Parking'
    } >>
Incidentally, you can include multiple fields and values, and even multiple records if you like. I am just using a single field, value, and record in the interest of keeping things simple. You can see some examples of more elaborate Insert Into statements here.
Finally, let’s wrap things up by confirming that the new value was indeed added by using a Select statement on the Violations table. Here is the command that I am using:
Select * From Violations
You can see the command and the results in Figure 7.
About the Author
Brien Posey is a 19-time Microsoft MVP with decades of IT experience. As a freelance writer, Posey has written thousands of articles and contributed to several dozen books on a wide variety of IT topics. Prior to going freelance, Posey was a CIO for a national chain of hospitals and health care facilities. He has also served as a network administrator for some of the country’s largest insurance companies and for the Department of Defense at Fort Knox. In addition to his continued work in IT, Posey has spent the last several years actively training as a commercial scientist-astronaut candidate in preparation to fly on a mission to study polar mesospheric clouds from space. You can follow his spaceflight training on his Web site.
 Bitcoin
  Ethereum
  Tether
  BNB
BNB  USDC
USDC  XRP
XRP  Solana
  TRON
TRON  Figure Heloc
  Hyperliquid